Sending activation tokens
The next step is to hook this up to our registerUserHandler, so that we generate an activation token when a user signs up and include it in their welcome email — similar to this:
Hi,

Thanks for signing up for a Greenlight account. We're excited to have you on board!

For future reference, your user ID number is 123.

Please send a request to the `PUT /v1/users/activated` endpoint with the following JSON
body to activate your account:

{"token": "RMMCV3MZCEBYQADXBODCLTAF6L"}

Please note that this is a one-time use token and it will expire in 3 days.

Thanks,

The Greenlight Team
The most important thing about this email is that we’re instructing the user to activate by issuing a PUT request to our API. We’re not asking them to activate by clicking a link that contains the token as part of the URL path or query string.
Having a user click a link to activate via a GET request (which is used by default when clicking a link) would certainly be more convenient, but in the case of our API it has some big drawbacks. In particular:
It would violate the HTTP principle that the
GETmethod should only be used for ‘safe’ requests which retrieve resources — not for requests that modify something (like a user’s activation status).It’s possible that the user’s web browser or antivirus will pre-fetch the link URL in the background, inadvertently activating the account. This Stack Overflow comment explains the risk of this nicely:
That could result in a scenario where a malicious actor (Eve) wants to make an account using someone else’s email (Alice). Eve signs up, and Alice received an email. Alice opens the email because she is curious about an account she didn’t request. Her browser (or antivirus) requests the URL in the background, inadvertently activating the account.
All in all, you should make sure that any actions which change the state of your application (including activating a user) are only ever executed via POST, PUT, PATCH or DELETE requests — not by GET requests.
But for now, if you’re following along, go ahead and update your welcome email templates to include the activation token as follows:
{{define "subject"}}Welcome to Greenlight!{{end}}

{{define "plainBody"}}
Hi,

Thanks for signing up for a Greenlight account. We're excited to have you on board!

For future reference, your user ID number is {{.userID}}.

Please send a request to the `PUT /v1/users/activated` endpoint with the following JSON
body to activate your account:

{"token": "{{.activationToken}}"}

Please note that this is a one-time use token and it will expire in 3 days.

Thanks,

The Greenlight Team
{{end}}

{{define "htmlBody"}}
<!doctype html>
<html>

<head>
    <meta name="viewport" content="width=device-width" />
    <meta http-equiv="Content-Type" content="text/html; charset=UTF-8" />
</head>

<body>
    <p>Hi,</p>
    <p>Thanks for signing up for a Greenlight account. We're excited to have you on board!</p>
    <p>For future reference, your user ID number is {{.userID}}.</p>
     <p>Please send a request to the <code>PUT /v1/users/activated</code> endpoint with the
    following JSON body to activate your account:</p>
    <pre><code>
    {"token": "{{.activationToken}}"}
    </code></pre>
    <p>Please note that this is a one-time use token and it will expire in 3 days.</p>
    <p>Thanks,</p>
    <p>The Greenlight Team</p>
</body>

</html>
{{end}}
Next we’ll need to update the registerUserHandler to generate a new activation token, and pass it to the welcome email template as dynamic data, along with the user ID.
Like so:
package main

import (
    "errors"
    "net/http"
    "time" // New import

    "greenlight.alexedwards.net/internal/data"
    "greenlight.alexedwards.net/internal/validator"
)

func (app *application) registerUserHandler(w http.ResponseWriter, r *http.Request) {

    ...

    err = app.models.Users.Insert(user)
    if err != nil {
        switch {
        case errors.Is(err, data.ErrDuplicateEmail):
            v.AddError("email", "a user with this email address already exists")
            app.failedValidationResponse(w, r, v.Errors)
        default:
            app.serverErrorResponse(w, r, err)
        }
        return
    }

    // After the user record has been created in the database, generate a new activation
    // token for the user.
    token, err := app.models.Tokens.New(user.ID, 3*24*time.Hour, data.ScopeActivation)
    if err != nil {
        app.serverErrorResponse(w, r, err)
        return
    }

    app.background(func() {
        // As there are now multiple pieces of data that we want to pass to our email
        // templates, we create a map to act as a 'holding structure' for the data. This
        // contains the plaintext version of the activation token for the user, along
        // with their ID.
        data := map[string]any{
            "activationToken": token.Plaintext,
            "userID":          user.ID,
        }

        // Send the welcome email, passing in the map above as dynamic data.
        err := app.mailer.Send(user.Email, "user_welcome.tmpl", data)
        if err != nil {
            app.logger.Error(err.Error())
        }
    })

    err = app.writeJSON(w, http.StatusAccepted, envelope{"user": user}, nil)
    if err != nil {
        app.serverErrorResponse(w, r, err)
    }
}
OK, let’s see how this works…
Restart the application, and then register a new user account with the email address faith@example.com. Similar to this:
$ BODY='{"name": "Faith Smith", "email": "faith@example.com", "password": "pa55word"}'
$ curl -d "$BODY" localhost:4000/v1/users
{
    "user": {
        "id": 7,
        "created_at": "2021-04-15T20:25:41+02:00",
        "name": "Faith Smith",
        "email": "faith@example.com",
        "activated": false
    }
}
And if you open your Mailtrap inbox again, you should now see the new welcome email containing the activation token for faith@example.com, like so:
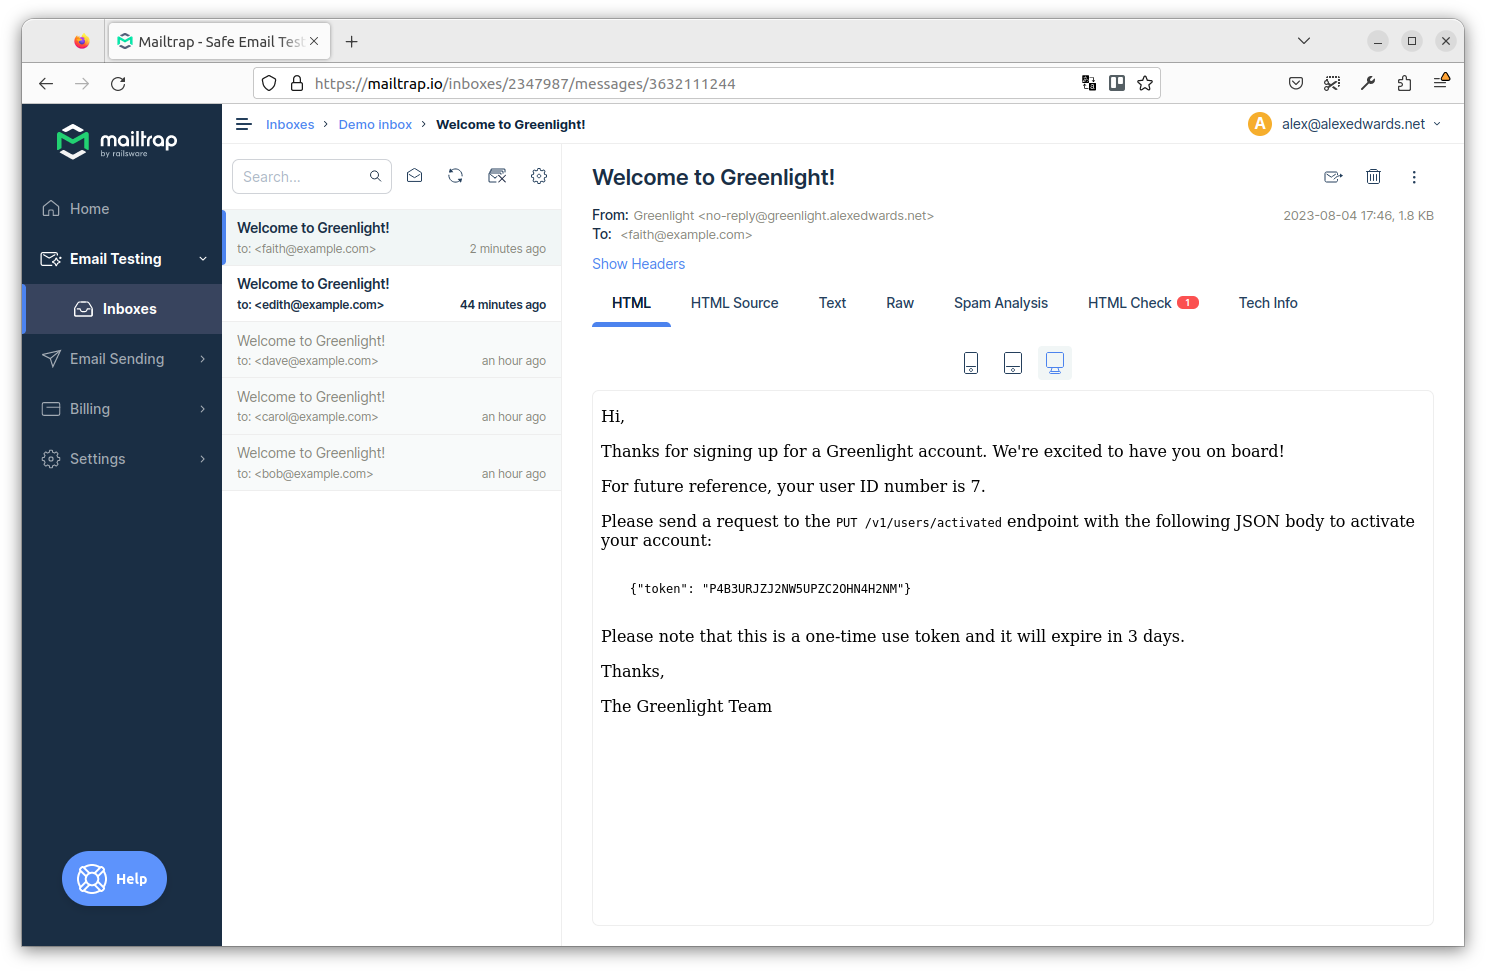
So, in my case, we can see that faith@example.com has been sent the activation token P4B3URJZJ2NW5UPZC2OHN4H2NM. If you’re following along, your token should be a different 26-character string.
Out of interest, let’s quickly look inside the tokens table in our PostgreSQL database. Again, the exact values in your database will be different, but it should look similar to this:
$ psql $GREENLIGHT_DB_DSN
Password for user greenlight:
psql (15.4 (Ubuntu 15.4-1.pgdg22.04+1))
SSL connection (protocol: TLSv1.3, cipher: TLS_AES_256_GCM_SHA384, bits: 256, compression: off)
Type "help" for help.

greenlight=> SELECT * FROM tokens;
                                 hash                               | user_id |         expiry         |   scope
--------------------------------------------------------------------+---------+------------------------+------------
 \x09bcb40206b25fe511bfef4d56cbe8c4a141869fc29612fa984b371ef086f5f5 |       7 | 2021-04-18 20:25:41+02 | activation
We can see here that the activation token hash is displayed as the value:
09bcb40206b25fe511bfef4d56cbe8c4a141869fc29612fa984b371ef086f5f5
As we mentioned earlier, psql always displays values in bytea columns as a hex-encoded string. So what we’re seeing here is a hexadecimal encoding of the SHA-256 hash of the plaintext token P4B3URJZJ2NW5UPZC2OHN4H2NM that we sent in the welcome email.
Notice too that the user_id value of 7 is correct for our faith@example.com user, the expiry time has been correctly set to three days from now, and the token has the scope value activation?
Additional information
A standalone endpoint for generating tokens
You may also want to provide a standalone endpoint for generating and sending activation tokens to your users. This can be useful if you need to resend an activation token, such as when a user doesn’t activate their account within the 3-day time limit, or they never receive their welcome email.
The code to implement this endpoint is a mix of patterns that we’ve talked about already, so rather than repeating them in the main flow of the book the instructions are included in this appendix.